Friday 31 May 2013

New Launch: Edgars Beauty Online Store {Red Square}


Hi fellow Beauty Addicts,

Have you ever read the books from Sophie Kinsella, Shopaholic, or the very least seen the movie?  Then you shall know that as women we can NEVER have enough of shopping, and thanks to Edgars Red Square, we can now browse through hundreds of fabulous beauty products to our heart's content:


Enter online shopping heaven at:  www.redsquare.co.za

Online shopping in South Africa have sky-rocketed over the past few months, with amazing stores now available 24/7.

You can shop Red Square online store for all your make-up, skincare, fragrance and hair needs, and lucky us there is a men's section too, just in time for fathers day hoorrayy!  You'll also find major brands available my favourites being Gosh, Nails Inc., Jimmy Choo and a wide variety of celebrity fragrances.

Okay, so here's how it all works and what you can expect:

~  Free delivery for orders over R350.00, otherwise a standard delivery fee of R45.00 per order will be charged.

~  3 Free samples when you order online, plus the opportunity to review them personally and share your experience and thoughts with other women.

~  Signature gift wrapping service, a red square gift box with tissue paper and a personalized note with your message.

~  R100.00 off with your 1st online purchase of R650.00+ using voucher code:  press100 (offer valid until 30 June 2013).

~  Payment options:  Edgars, Jet, Boardman's, Legit and Thank U account cards as well as all major credit cards.

If you have any questions or need further assistance, please contact the Red Square call centre on 0800 203 925.

I hope you're as excited as I am, and let me know if and when you purchase anything?


Read More »

Thursday 30 May 2013

Tutorial: Wearable Smokey Eye

Hi Beauties,

I hope you're having a fab week so far?

I'm literally counting down to the weekend, well truthfully I've done so since Monday.  This is going to be a proper movie weekend as two of my favourite movies are being released:  Hangover 3 and 3D Texas Chainsaw Massacre.  As you can imagine I'm going to do minimum blogging this weekend, but I really wanted to get this tutorial up, it's one of my favourite looks all year round.

This is one of my go to looks, I adore purple shades and it works particularly well if you're dark-haired with brown eyes, and you can create a wearable smokey eye with colours other than black or grey.  It's also really easy, if you're not very good with make-up applications I assure you that you'll get the hang of it quickly:
Optional Step: 
 
Start with an eyeshadow base, I love this one from Essence, I find that if you do wear a good quality foundation like the Gosh X-Ceptional wear, that you don't particularly need a primer or base, I normally do this if I want my look to last the whole day.  Just spread a dollop of this all over your eyelid, it dries quickly and also helps create a crease-free look.
Take a highlighting colour, I don't know what the name is of this as NYX haven't listed the names on their palette, normally 2 - 3 shades lighter than your skintone is the perfect highlighting colour.  Dab a bit at the arch (or highest area of your eyebrow), this helps to define and lift your brow bone.
The colour I've chosen is 'irresistible purr-ple' which is such a gorgeous and flirty colour, take the deep shade and pat it onto your lower eyelid area.  I use a patting motion instead of sweeping, which helps intensify the shade of the eyeshadow, and also minimises any fallout.  Take the eyeshadow only up to your crease line, when you look directly into the mirror you are suppose to just see the purple line sticking out very slightly.
Take a big fluffy blending brush, and in a downward movement blend, I'm not using a transition colour here, lightly use small circular movements from left to right and blend it in lightly.  The reason you're holding your brush in a downward motion, is so that your eyeshadow colour doesn't drag or smudge out (like I mentioned before you don't want your colour too high up from your crease line, if you hold it upwards you'll drag the colour up and out and go far above this line), instead when you hold your brush downward you're merely blending.  As a test try it out, you'll notice a massive difference.  Be careful not to overblend, blending is merely creating a soft line, if you do struggle use a transition colour, that is a shade that is 1 - 2 shades darker than your skin tone, which you lightly buff over the area you're trying to blend in and it helps create a smooth soft line.
Using a lighter colour of your choice (white also works well), dab into the inner corner of your eye, this creates the illusion of bigger eyes.
 Optional Step:
 
By now you should have a really lovely and wearable eye, if you're not used to wearing make-up I'd maybe suggest that you skip this step and instead try it for a night out.  Of course I'm used to wearing loads more, so this is a wearable day look for me ;)
 
With a tapered brush, dip into the dark charcoal eyeshadow of the NYX palette, and create a horizontal v-shape, rub off excess eyeshadow and lightly blend with the tapered brush, then in a downward motion blend all the colours with the big blending brush. 
Using this Essence liquid eyeliner, which is my absolute favourite!  I much prefer a tapered felt liner than a brush, but everyone likes different application methods so you may have to try various ones to see which you are most comfortable with.  The easiest way to draw a winged eyeliner, is get a smaller mirror (free standing), rest your arm on something (a table for example), then draw a line at the outer corner of the eye.  Don't worry if you messed it up a bit, you can either draw over it and manipulate it the way you want, or if you made a big oopsie take a q-tip or earbud, dip in a teeny bit of water and rub off.  Once you've drawn your little line which acts as the base for the liner, in small strokes extend from the outside to the inside.  To make your eyes appear bigger and give it a lovely shape, make sure your liner is thicker on the outside and tapers into a very thin line to the inner corner of your eye. 
 
If you're not familiar with liquid eyeliners, it'll take some practise to get used to it and figure a style that you like.
 
Alternatively:  For a more wearable look or for any novices out there, use a normal black kohl or eyeliner on the top lid then lightly use the back of the liner to smudge the line, creating a softer but still dramatic enough look that gets you noticed.
 
PS:  I didn't wear any eyeliner on the bottom and I rarely do, I find that it makes my eyes appear very small, plus my eyes go red very quickly, and that seems to aggravate it a bit. 
For a wearable look I don't pack on mascara, however, the Gosh Boost Your Lashes is very buildable and you can create very dramatic eyelashes if you want to.  I didn't curl my eyelashes with a curler, I used one coat mascara, whilst still wet I applied the Essence fibres, then packed on two more coats of mascara.  Don't forget to do the top of your lashes with your first coat, especially if you need volume, it really helps loads to do a quick sweep at the top of your lashes then the "underside" - LoL is that event he right word?
 
I hope you enjoyed this tutorial and that some of my tips and tricks have helped you.  Let me know if there is any tutorials you'd like to see?
 
Hope you have a fab Friday tomorrow! 


Read More »

Sunday 26 May 2013

Tutorial: How to get Big Glamorous Hair

Hi Pretties,

One of the things I get asked the most and stopped often in shops for is how I get my hair so big, whether you love it or loathe it, but it surely gets your attention.

I know big hair isn't for everyone, and just as a little side note, I've worn my hair big and teased for years, way before Jerseylicious became popular, I guess you could refer to me as the South-African version of Jersey {although I've heard that not everyone looks like that in New Jersey so no pun intended}.

Like I said, this hairstyle isn't for everyone, you need confidence and attitude to pull it off as you will get attention!  I don't really care what people think of it, whether you like it or not, it's not going to change my opinion on it, and I've heard it all, a client once referred to me as "the girl with the big hair" LoL, I don't mind it, thank God we all have different tastes and styles right, otherwise the world would be rather boring.  So if you do love having BIG and glamorous hair, here's all my tips and how-to's.  This isn't the healthiest thing to do to your hair but truthfully neither is blow drying, straightening and colouring, so the best thing to do is try and put back as much goodness as you can by regularly using treatments and always using an intense conditioner, heat protectant spray and serum.
What you will need:
 
Velcro rollers (large sizes)
Bobby Pins - to secure the rollers
Brush
Teasing Comb
Hairspray, I prefer the orange one from Perfect Touch, it's my holy grail hairspray!
Serum
STEP 1:
 
I just blow dryed it straight with a big round brush, then using various large size rollers rolled the top section of my hair and heated them up with my blow dryer with a spritz of hairspray on each roller and let it set for a few minutes.  As you can see you'll already have loads of volume in your hair and if you're not a fan of teasing or going too big, you can easily leave your hair like this, with a few spritzes of hairspray you'll have a lovely glam look for day or night without going over the top.
STEP 2:
 
Section off a piece of hair in a kind of square shape just at the crown of your hair.  I don't like teasing all of my hair just the top section which gives more than enough volume.  Split the section of hair in smaller pieces so you end up with a piece of hair that is approx. an inch thick (2 cm).
STEP 3:
 
Take the section of hair as per Step 2, spray hairspray just at the roots of your hair, don't spray higher than approx. 4 cm, taking your teasing comb or any other preferred comb, and tease just at the roots, I don't tease a lot, maybe 3 - 4 strokes, then take your hair dryer and dry that section of hair where you sprayed hair spray for a few seconds.  Using the blow dryer helps set the hairspray and helps so you don't have to tease as much.  Repeat each section the same.
STEP 4:
 
Take your hands and spread the section you've just teased and blow dryed, spreading it evenly and making sure there isn't any gaps or holes.
STEP 5:
 
Like I've mentioned before, I tease only the top square section at the crown of my head, after teasing and blow drying take a brush and lightly brush over the teased area to smooth it out, make sure there isn't any gaps or holes.  What I do after this step normally is take my hand and brush through it all with my hand, creating a shape I'm happy with, then I also lightly tease the right side of my hair as I do have loads of volume on the left (my fringe is that side).
 
This step takes practise, there is no set shape that suits everyone or that everyone likes, some people might prefer more of a bump like they had in the 50's, or more of a side swept area and just a little piece that is back-combed, it'll take a few tries for you to figure out what you like most and what suits you.
STEP 6:
 
Once you're happy with the look and shape of it, spray, spray ... and spray some more!  I use my hand to kind of press my hair up for a bit more volume, but you'll figure out what you like once you've played around a bit.
STEP 7:
 
Almost finished!  Take the bottom of your hair and lightly brush it out so your hair falls nicely and still looks soft and touchable {although you've just sprayed the living daylights out of it LoL} it's just a matter of illusion that's all ;)
And there you have it!  Lovely big glamorous hair ...
 
This truly isn't difficult to do whatsoever, the tricky part is figuring out which shape is the most flattering to your face shape and style/taste, which will only come with practise.
 
What I love about this hairstyle is that it stays voluminous for days afterwards, I never comb it out, all you're going to do is break off your hair and that's not cute and it's unnecessary.
 
I hope you'll give my tips and tricks a try, and let me know if you do, I'd love to see some pics!


Read More »

Saturday 25 May 2013

Outfit of the Day: You Rock my World

Hi Pretties,

Here's wishing you a relaxing and fun-filled weekend!

I adore blazers, from boyfriend to structured ones, and needless to say I got super excited when I saw this fabulous one in Foschini.  The detailing on this is impeccable:
 
 Look at Mrs Grumpy today ~ Haha just kidding I wasn't really grumpy but the sun and I had a staring contest and it won ;)


Jacket:  Foschini
Skinny Jeans:  Sissy Boy
Studded Pointy Shoes:  Fashion Express
Necklace:  Cotton On
Clutch Blag:  Mr Price
 
I want to share the funny story of our "behind the scenes" taking my outfit photos ~ I'm really lucky that my hubby takes most of them (obviously neither of us are professional photographers), I have a photo inspiration book from other bloggers, which I always show him and tell him how I should be posing or what I want to do that day, and he must direct me because I can't see what it looks like through a lense.  He doesn't like the fact that outfit photos "should" be more serious, so when I do the looking downward or staring into the sky no smile ones, he tells me to smile LoL, and no amount of protest from my side is going to change that, so now you know why I rarely have fashiony blog photos ;) but I do hope you still enjoy them.
 
Okay, back to the purpose of this post, blazers for winter and summer is a must have.  I have a few different ones in various colours and patterns, but obviously black is the most versatile.  They go with everything, therefore it helps to have a variety of styles, from cropped to boyfriend to structured, patterned and plain ~ wear them with dresses, leggings or jeans, over slogan t-shirts or jumpers and even pretty blouses or tops.  There is a blazer to fit every age, body shape and style preference.
 
I felt a bit like Michael Jackson in this blazer, and if I knew any awesome moves I'd have done them ;) I wore a plain white vest underneath and for a bit of colour I wore these cobalt blue shoes from Fashion express, the height is perfect and easy to walk in (aren't they darling?) and a fab bright pink clutch, the only pop of accessories is this gorgeous black stone necklace and a few dainty rings.
 
A simple smokey eye with pink and greys with a peachy cheek rounded off this look perfectly, and I had my hair in wavy curles which I'm really loving at the moment.  I also wanted to show you the after effects of ombre'ing your hair.  About 2 years ago (way before the ombre trend hit South-Africa) I ombre'd my hair, since then I've had my hair coloured loads of times, and still the ends of my hair fades first into a very blonde shade, the only way to get rid of ombre is to cut it off which I'm not going to do until it's way longer.  Although I loved it and I don't mind it too much, one doesn't realize at the time just how harsh it is on your hair, it's not healthy to bleach it.  Just a piece of advice if you're considering having it done.
 
How are you wearing your blazer this winter or summer? 


Read More »

Tuesday 21 May 2013

MAC Pigments Dupe - Essence Pigments

Hello Petals,

If you're a cosmetics lover like me ... You'll know very well about the highly praised MAC pigments, BUT I managed to find a great cruelty free dupe for them hoooorrayyy!


Essence Pigments ~ Available at Clicks:
 
-  Be my Brightsmaid
-  Strawberry Smoothie
-  Box of Chocolate
-  Smell the Caramel
 
These are highly pigmented, with the tiniest of glittery sparkles, these pigments are truly so beautiful!  As you can see from the swatches they give such a dramatic and colourful look, I actually wore "smell the caramel" over the entire lower eyelid, with "be my brightsmaid" in the corner of my eye, and used a darker brown just on the outer corners the other day, and was asked by one of the girls at the counter of a shop what eyeshadows I'm using :-)
 
With these you'll be able to create so many different looks, from subtle to dramatic, and they're also perfect to use as a liner, just spray a bit of make-up finishing spray on your hand, dip an angled brush in it, dip in the pigment of your choice and use as a lower and / or lower eyelid liner, subtle but dramatic enough to get you noticed!
 
PS:  Wanna know a little trick when applying pigments or glittery eyeshadow without messing all over your made-up face?  Tilt your head forward, looking downward and using a mirror to dab (not sweep) shadow on, you'll notice fall-out on your mirror instead of on your face, otherwise you can resort to either doing your foundation last or applying a good dusting of lose powder underneath your eyes {which I don't recommend for mature skin because a lot of powder accentuates wrinkles around the eyes}.
Essence Colour Arts Eye Base ~ Available at Clicks:
Transparent eyeshadow base especially for the application of pigments, for a long-lasting and luminous effect.
 
I tried this eyeshadow base with the pigments, truthfully, I found it rather messy and complicated, and felt that the pigments work perfectly find on their own, also this base claims to provide a luminous effect but the pigments on their own already provide that.  I haven't tried this as an all over eyeshadow base, ultimately I found that one doesn't really need this especially to be used with the pigments. 
 
Look out for the Essence collections, I know they've released limited edition pigments with some of their collections, can't wait to see which ones they're bringing out next :-)


Read More »

Monday 20 May 2013

Nailene Couture Design Nails

Hi my Lovelies,

Following on from my previous post, I got these beautiful nails for the Justin Bieber concert (which I still need to post about LoL ~ I'm trying to catch up on everything but promise it's up soon). 

I adore nail art or funky nails, and am actually waiting for an order I placed on ebay for some amazing bows, fingers crossed it gets here soon because South-African postal services have been on strike and have left consumers waiting for ever for parcels.  Anyway, look at the prettyness....
Nailene Couture Design Nails ~ R89.99 from Clicks:
 
The pack includes 24 nails, with glue, small nail file, cuticle stick and instructions (multiple languages).
 
It has the most beautiful black, grey and silver design, the nails are medium length so not too short or too long and in a square shape.
 
Application:
 
~  Make sure your nails are completely free of any residue or polishes
~  Lightly buff your nails, be careful not to buff it too much, the purpose of this step is merely to reduce shine (oil) on your nails which creates a matte foundation and helps nails to stick {oil or shine could make your nails lift}
~  Push back your cuticles lightly, cut your own nails short and shape
~  Select the right size nail
~  Apply a bit of glue on your nail as well as the stick on nail
~  Immediately apply the nail and press it firmly for about 20 - 30 seconds
 
... and voila!  There you have one nail done.
 
They last a really long time, in fact, they only come off when I soak them, and they look fabulous and natural, and they have several designs to choose from.  Most of the time I go for the french or natural look, which I often paint over anyway within a few days.
 

Note:
Nailene has made a statement to say that they do not test on animals, however, I have checked PETA and they're not listed on any of their lists, so at the moment I am taking their word for it but am a bit sceptic marking it as cruelty free. I tried searching on the internet but there's not a lot of information on it, so if you do actually know whether their statement is true or not, kindly let me know.


Read More »

Sunday 19 May 2013

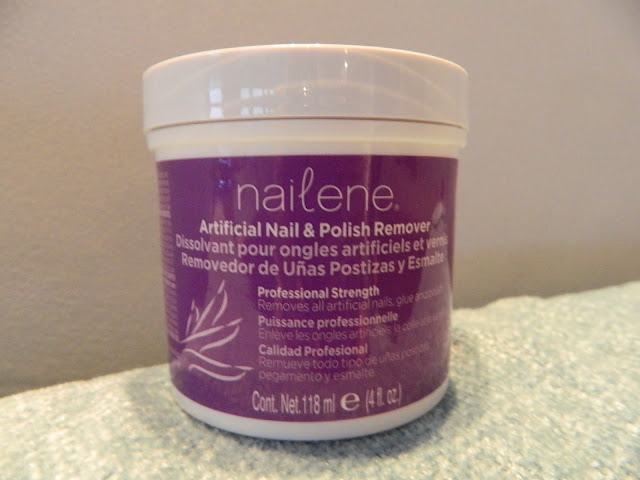
Nail Talk: Nailene Artificial Nail & Polish Remover

Hi Beauties,

Something I haven't discussed a lot on my blog *quite shameful really LoL* is my love for stick-on or acrylic nails {I don't like gel whatsoever}, there's quite a few reasons for this but mainly because I don't like my natural nails particularly the shape of them, and also nail polish lasts so much longer on false nails, whether it be stick-on's or acrylic.

Now if you've ever had false nails, you know what a mission it is to have them removed:
Nailene Artificial Nail & Polish Remover ~ R129.95 from Clicks:
Professional Strength
Removes all artificial nails, glue and polish
 
I basically change my nails almost weekly, sometimes I'll leave stick-on nails on for 2 weeks, but by then they would've been painted a rainbow of colours already.  It used to be such a hassle for me to remove the nails, and I would sit out at least 2 hours of soaking them in acetone preferably with an awesome movie or two to help the time go by much quicker, not to mention that awful smell.
 
But now it's no longer necessary!  Soaking nails off in 40 minutes which is a record time and makes my weekly pamper day so much more enjoyable :-)
 
Using this nifty little thing is super easy, you just dip your nail into the brush area, soak for a few seconds and twist around.  Be careful not to soak your nail for longer than 2 minutes at a time, so what I do is soak and twist one nail for two minutes, then rotate to another nail, if there is still residue left on the previous nail, go back and do that one again for no longer than 2 minutes.  Removing stick-on's took just a little less than 40 minutes, but just soaking off nail polishes is about 15 minutes!
 
It's not messy at all, and if you have a pet peeve removing glittery nail polishes, you will love this!  The little brushes help scrub them off, it honestly makes the whole polish or nail removal process so much easier.
 
Just be careful when you do have artificial nails on with nail polish and you just want to soak off the polish, it will actually start removing the artificial nails even if you soak it for a few seconds only ~ this I learned by trial and error LoL.
 
Note:
Nailene has made a statement to say that they do not test on animals, however, I have checked PETA and they're not listed on any of their lists, so at the moment I am taking their word for it but am a bit sceptic marking it as cruelty free.  I tried searching on the internet but there's not a lot of information on it, so if you do actually know whether their statement is true or not, kindly let me know.


Read More »
Related Posts Plugin for WordPress, Blogger...